

But wouldn't it be nice to have a shortcut to Windows Explorer on the Quick Launch Toolbar so when you quickly need to fetch a file, you can do it in one click?
The Quick Launch Toolbar contains small icons that are one-click shortcuts to popular programs. It is located on the blue Taskbar immediately to the right of the Start button on the Windows Desktop. If you do not see the Quick Launch Toolbar, right-click in an empty place on the blue Taskbar, hover the cursor over "Toolbars" and click Quick Launch.
Look at the Quick Launch Toolbar. Do you see two vertical lines at both sides of the toolbar? If so, hover the mouse over the vertical lines on the right side until the cursor changes into a horizontal arrow. Press the mouse button and drag the lines to the right to make room for the shortcut we are going to create.
If there are no vertical dotted lines, right-click in an empty area on the Taskbar but NOT on an icon, and click Lock the Taskbar to remove the checkmark. Then make room for the icon as described above.
Now follow these directions:

- From the Windows Desktop, click Start and click Search. [If a window pops up asking "What do you want to search for?" - click All files and folders.]
- In the Search window, make sure "Local Hard Drives" is listed in the "Look in" box.
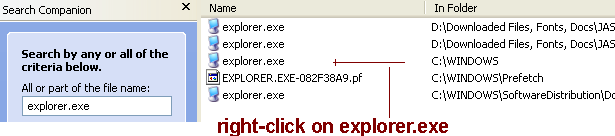
- In the box labeled "All or part of the file name," type explorer.exe and click Search. You may get more than one result.
- Right-click on explorer.exe that is located in WINDOWS. If you do not have a WINDOWS folder but you have a WINDOWS32 folder, use the file in that folder. Then click Create Shortcut. See the image below.
- When a small windows pops up asking if you want the shortcut to be placed on the desktop, click Yes.
- Cancel out of the Search window. Go to the Windows Desktop and look for an icon labeled "Shortcut to explorer.exe".
- If you don't like the icon image, right-click on the shortcut and click Properties and click Change icon. Click on a different icon and click OK. Then click Apply and click OK.
- Now, while pressing the mouse button, drag the shortcut icon into the empty space in the Quick Launch Toolbar. If you see the "not allowed" circle, try again until you can successfully "drop" the icon onto the toolbar by releasing the mouse button.
Now, whenever you want to look at your folders and files with one click, just click the Windows Explorer shortcut icon from the Quick Launch Toolbar.
We have tutorials on our website that will help make you proficient in Windows, including Microsoft Office Version and Windows Version Compatibility Chart.