Showing posts with label Microsoft Windows. Show all posts

How to Increase Laptop Speakers Volume!

Are you disappointed with the volume of your laptop? Or is your netbook speaker volume too low?


Do you wish you could make your laptop's volume LOUDER? For most folks, the answer is yes.

The following instructions will show you how to increase the volume of your laptop speakers.

It has worked for my last 4 laptops, so I hope it works for you as well.

DIRECTIONS:

1. Click Start and click Control Program.

2. In the upper right corner, after "View by" you will see either Category, Small icons, or Large icons. We recommend displaying the Control Panel with icons.

  • If your Control Panel shows icons, then click Sound
  • If your Control Panel shows categories, click Hardware and Sound. In the right side of the next window, find Sound in the list and click Manage audio devices.

3. On the Sound window, select the Playback tab.


4. Click on the appropriate speakers (probably labeled "default") and click Properties.

5. On the Properties window, click the Enhancements tab.

6. Notice the option Loudness Equalization. Before putting a checkmark or tick in the box next to it, click on the words to highlight them. A Preview button displays below. Click it and notice the volume produced.

7. Now, put a check-mark or tick in the box by Loudness Equalization and click the Preview button again. The volume should be louder. Yeah!

8. Click Apply and click OK to close the Properties window. Then click OK to close the Sound window.

You may now want to reduce the volume of your PC or it may be louder than you want for certain applications, especially for System Sounds. And that's it!

By the way, check out are popular tutorial regarding which versions of Microsoft Office run on which versions of Microsoft Windows. There is not anything like it on the Internet! Microsoft Windows and Office Product Compatibility Chart.

Cheers!


Change the Size of the Start Menu Icons


How can I make the Windows program icons on the Start Menu larger? Or perhaps they are taking up too much space and you'd like to know how to make them smaller.


Well, good news. Microsoft Windows allows you to choose a large size for icons or a small size for iconsTo change the size of the icons, follow the instructions below.

  1. Click Start | Control Panel. (If using Classic mode, click Start | Settings | Control Panel).
  2. From the Control Panel, double click Taskbar and Start Menu. (If in category view, click Appearances and Themes first).
  3. On the Taskbar and Start Menu window, click the Start Menu tab and click the Customize button.
  4. On the General tab of the Customize Start Menu window, go to the first section regarding icon size and click Large icons.
  5. Click OK. Then click Apply and click OK.
  6. Now click Start and you will see that the icons on the Start menu have changed size.


Is Your Touchpad Mouse Opening Windows You Don't Want Opened?

Our new Windows 7 laptop touch-pad mouse is driving me crazy. If the cursor innocently hovers over a program shortcut (icon) on the desktop, Windows opens the program!

If I'm looking at a list of items on a window, such as Windows Explorer, deciding what I need and my finger rests on the touchpad (trackpad), the folder or file opens. 

Windows are opening all over the place! Aaaargh!

This may not be new to Windows 7, but I don't remember this happening on any of our other laptops. We just bought a Windows netbook and if the cursor just happens to rest on an icon or a file, it opens. This will not do! 

Keep reading to find out how to stop the mouse cursor from opening practically everything and anything that can open - Word documents, Excel documents, Microsoft products, other products ... anything that you usually double-click to open.

Here is what is happening. On some Windows 7 laptops, the "tapping" feature is enabled by default. It is this feature that is opening windows when the mouse cursor hovers over an item and your fingers touch the touchpad in any way.

So, if you like to rest your fingers on the touchpad while you're thinking also, turn this feature off by following these easy steps:

  1. Click Start | Control Program. Click the Mouse icon if it is there, and the "Mouse Properties" window opens. (On Control Panel, you may have to click Appearance & Personalization, Personalization, and then the Mouse icon.
  2. Click the tab labeled Device Settings (on some systems the tab is labeled with the mouse name, e.g. Elan). Make sure the touchpad mouse is selected (highlighted) and then click Settings (or Options).
  3. In the left column, remove the check mark in front of Tapping. Click Apply and click OK. (On some systems you may have to click on the word Tapping and then remove the check mark in the box next to "Enable Tapping.") Click Apply and click OK.
  4. Click OK to close the Mouse Properties window. Then close Control Panel.

We haven't purchased a Windows 10 laptop yet ... just desktops, so it may happen with that operating system as well. Cheers!


Putting the "My Computer" Icon on the Windows 7 Desktop

You just got your new Windows PC and you like it! However, there is no My Computer icon - or shortcut - on the desktop or in the Start Menu. Hmmm.


If you're like most folks, you use the My Computer or Computer shortcut (Windows Explorer) a lot in order to look at your various files and folders, drives, and other settings.

In Windows 7, "My Computer" is just called "Computer", but on some new computers the icon shortcut is missing; it doesn't display anywhere on the desktop.

However, it is not difficult to ask Windows 7 to display the "Computer" icon. So follow these steps to learn how to place a shortcut to My Computer on Windows 7:

► Right-click in a blank area of the desktop and click Personalization
► On the left sidebar, click Change desktop icons
► On the "Desktop Icon Settings" window, click to place a checkmark in the box next to "Computer." Optionally, from this window you can also:
Place a checkmark next to any of the other choices: User's Files, Network, Recycle Bin, and Control Panel
Change the icon for any of these five shortcuts by clicking on the icon, clicking Change Icon, selecting a different icon, and clicking OK.
► Click Apply and click OK

That's it! For more Windows 7 desktop customizing options, please see our tutorial How to Customize the Windows 7 Desktop.


View (Preview) Your PC Images in a Slide Show

It's sad that so many folks don't realize they can view their photographs on a Windows computer as a slide show. It's a really great feature, and and this article shows how to do it.


The original post we wrote here discussed viewing images as a filmstrip, an obsolete term now, no doubt(!), because that's what it was called until Microsoft launched Windows 7.

Today, images can be viewed as a slide show using the Windows Photo Viewer, so let's get started.

Go to Computer and Find the Images Folder

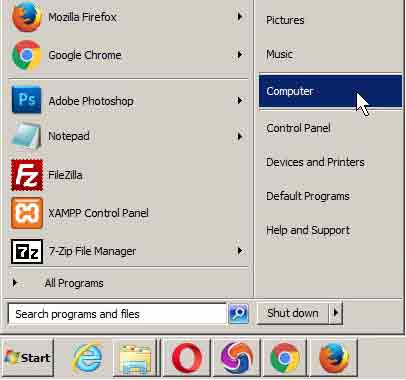
First we find the folder that contains the images we wish to view as a slide show. Click the Start button and click Computer. Or you may have an icon in the Quick Launch toolbar to go Computer.


Then click on the folder where the images are stored.

Select the Image to Kick Off the Slide Show

It doesn't matter what image you begin with. The Windows Photo Viewer will continuously scroll through the images in the folder until you exit the window.

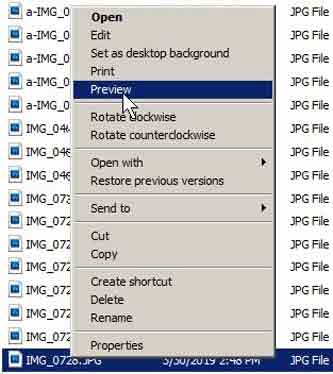
To begin the slide show, right-click on an image file and click Preview - as shown below.


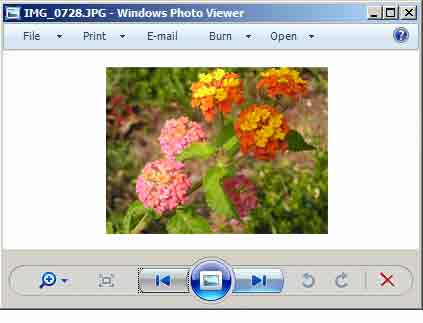
The selected image is now shown in the Windows Photo Viewer window.

Begin the Photo Slide Show

In the Windows Photo Viewer, shown below, notice several things. First, the name of the current photo displays on the top bar. Then notice the controls at the bottom of the window.


The magnifying glass at left allows you to zoom in on the current photo, and the second icon fits the current image to the window, which you can resize of course. And the right most icons allow you to rotate the image, and exit the viewer.

The center icons are what we are focusing on today. The left arrow begins the slide show progressing up the list of images in the folder, and the right arrow shows the images in the folder proceeding downward through the list of image files.

The large middle icon, when clicked, explands the Windows Photo Viewer full screen, and the images automatically scroll about every 4-6 seconds. Click anywhere in the window to move to the next image. To exit full screen, press the Esc key.

This is a neat feature - especially if your PC is attached to a TV. It's a great way to show off your photos on the largest video screen you have!

Thanks for stopping by. Cheers!


Below is the original article about viewing images with Windows Filmstrip: When viewing your files in Windows via My Computer or Windows Explorer, you can view them, typically, in five different ways: Thumbnail, Files, Icons, List, and Details.

If you are not familiar with the Views menu, see our blog Cool Ways to View Your PC Files

However, there is a very cool viewing option that only appears on the Views menu when you are viewing the contents of a folder with many images. This is the Filmstrip viewing option!

When you click Filmstrip, the thumbnails of the images in the folder display horizontally at the bottom of the window, and a large version of the active thumbnail displays at the top of the window - as shown below. In real life the large image would be larger than shown because I had to make my illustration small enough to fit this blog post.
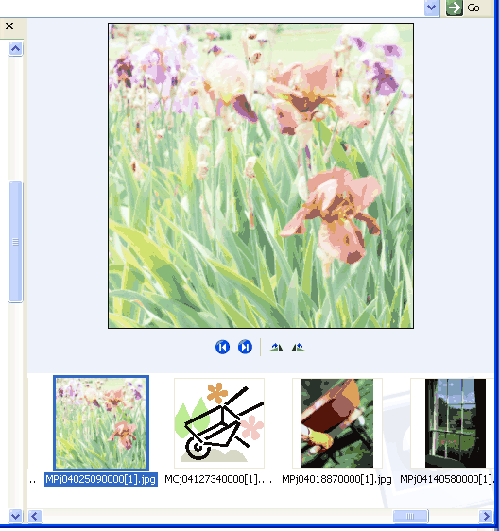

You use the left and right arrows to scroll through the images in the file. And there are little icons that allow you to rotate the image. This is a nice way to be able to view a folder of photographs of a trip or event.

If you are using Filmstrip to hunt for a particular image, when the desired image pops up, just double-click on the thumbnail and the image will open in your image-editing program.

Cool, huh.

Search for PC Files or Documents the Easy Way!


Is your Windows My Documents or Documents folder getting large? Is it hard to find a required file? Here is a speedy way to search just the files in My Documents or Documents.


If you an advanced user and store files in folders you have created, you can use this technique on any data folder.

  1. Open a Windows Explorer or My computer window. To access Windows Explore, right click Start and click Explore.
  2. Click on the My Documents (or Documents) folder. If using Windows Explorer, click on the folder in the leftmost column.
  3. Press Ctrl-F to open the "Search" window. Type either a partial file name, or a word or phrase within the document.

    • The first text box is for typing part of a file name. You can use wildcards in your file name. For example, if you know it is a Word document, you can type *.doc to narrow the search to just Word documents.
    • The second text box lets you type a word or phrase from the document. If you are looking for the document that describes the red winged black bird, type that phrase into the box.
  4. Then click Search and only My Documents will be searched. Windows will display a list of files that meet your criteria.
  5. Double-click on the file you want to open.
  6. If you want to return to My Computer, click the little X above the left Search column to close the Search Companion. You cannot return to Windows Explorer.

Windows Explorer is so much more useful than My Computer than you should create a shortcut for it on your Quick Launch Toolbar and learn to use it.

For instructions, see our blog post How to Create a "Windows Explorer" Shortcut and Place it on the Quick Launch Toolbar.

For several super tutorials on using Windows Explorer to Managing Your PC Data, go to our main tutorial website.


How to Close an Unresponsive Program


Once in a while you will try to close a program and it refuses to end. It just hangs around and ignores you. Sometimes you can minimize the window and carry on. Other times the program freezes up your PC!


Here is the best method to force an unresponsive PC program to close or end.
  1. Press the Ctrl, Alt, and Del keys at the same time. (Press and hold each key while you press the next key.) This should open Windows Task Manager. If it brings up a different window, press the Task Manager tab.
  2. Click the Applications tab. You should see a list of all of the applications running on your PC.
  3. Click on the name of the misbehaving application and click End Task at the bottom of the window. Hopefully, the application will close. If you receive a message informing you that the application is not responding, click End Now.

If the application still will not close, try this same process again. Be patient and do not press any keys while the system is displaying the busy icon.

If this process does not close the application and you cannot continue working, you will have no choice but to reboot your PC. This is one reason why it is important to frequently save the files or documents that you are working on.


How to Hide "Recent Documents List" on the Start Menu

On some Windows systems, a list of the most recent documents or files you opened is available for viewing when you click Start. And clicking on a file in the list opens the file. If you use a handful of files over and over, this is a very quick way to access these files. However, if you share a PC, everyone else can see the files you have recently opened.


If you work with a lot of documents or files during the day, it is impractical to use the Recent Document list. And file names you've deleted often stay on the list for a while. Many folks keep a minimized copy of Windows Explorer or My Computer open at all times on their PC. When they need to open a file, they locate it and double-click on its file name.

If you would like to hide this list for security reasons, because you don't use it, or to de-clutter the Start menu window, follow the instructions below.
  • Click Start | Control Panel. (If using Classic mode, click Start | Settings | Control Panel).
  • From the Control Panel, double click Taskbar and Start Menu. (If in category view, click Appearances and Themes first).
  • On the Taskbar and Start Menu window, click the Start Menu tab and click the Customize button.
  • On the Customize Start Menu window, click the Advanced tab.
  • On the lower part of the window, remove the checkmark from the List My Most Recently Opened Documents box.
  • Click the Clear List button and click OK.
  • On the previous window, click Apply and click OK.

Now when you click Start, you should not see the Recent Documents list any longer.


How to Create a "Windows Explorer" Shortcut and Place it in the Quick Launch Toolbar

It is important that PC user knows how to manage the files and folders that store their data. The best way to view the files and folders on the PC is to use Windows Explorer. You can open a WIndows Explorer window by right-clicking on the Start button and clicking Explore.


But wouldn't it be nice to have a shortcut to Windows Explorer on the Quick Launch Toolbar so when you quickly need to fetch a file, you can do it in one click?

The Quick Launch Toolbar contains small icons that are one-click shortcuts to popular programs. It is located on the blue Taskbar immediately to the right of the Start button on the Windows Desktop. If you do not see the Quick Launch Toolbar, right-click in an empty place on the blue Taskbar, hover the cursor over "Toolbars" and click Quick Launch.

Look at the Quick Launch Toolbar. Do you see two vertical lines at both sides of the toolbar? If so, hover the mouse over the vertical lines on the right side until the cursor changes into a horizontal arrow. Press the mouse button and drag the lines to the right to make room for the shortcut we are going to create.

If there are no vertical dotted lines, right-click in an empty area on the Taskbar but NOT on an icon, and click Lock the Taskbar to remove the checkmark. Then make room for the icon as described above.

Now follow these directions:

  1. From the Windows Desktop, click Start and click Search. [If a window pops up asking "What do you want to search for?" - click All files and folders.]
  2. In the Search window, make sure "Local Hard Drives" is listed in the "Look in" box.
  3. In the box labeled "All or part of the file name," type explorer.exe and click Search. You may get more than one result.
  4. Right-click on explorer.exe that is located in WINDOWS. If you do not have a WINDOWS folder but you have a WINDOWS32 folder, use the file in that folder. Then click Create Shortcut. See the image below.
  5. When a small windows pops up asking if you want the shortcut to be placed on the desktop, click Yes.
  6. Cancel out of the Search window. Go to the Windows Desktop and look for an icon labeled "Shortcut to explorer.exe".
  7. If you don't like the icon image, right-click on the shortcut and click Properties and click Change icon. Click on a different icon and click OK. Then click Apply and click OK.
  8. Now, while pressing the mouse button, drag the shortcut icon into the empty space in the Quick Launch Toolbar. If you see the "not allowed" circle, try again until you can successfully "drop" the icon onto the toolbar by releasing the mouse button.


Now, whenever you want to look at your folders and files with one click, just click the Windows Explorer shortcut icon from the Quick Launch Toolbar.

We have tutorials on our website that will help make you proficient in Windows, including Microsoft Office Version and Windows Version Compatibility Chart.


Sorting PC Files the Speedy Way

When viewing the contents of My Documents using My Computer or Windows Explorer, you can view the contents in various ways. If you are unfamiliar with the Views icon, see our blog Cool Ways to View Your PC Files.

When looking at your files via the "List" or "Details" view, you can sort by clicking on the heading of the column you want to sort on. However, there are no columns when viewing with the Thumbnails, Tiles, or Icons options.

Don't worry! To quickly sort the contents of a folder regardless of what view you are using, right-click in a white area of the viewing area, hover the cursor over "Arrange Icons by" and choose the column you want to sort on from the list provided. See the image below.


Note: When sorting by Modified (meaning "Date Modified"), Windows will always sort Oldest to Newest. So go to the bottom of the list to find the most recent files.


Yeah! A Method for Printing the Contents of a Folder in Microsoft Windows

On occasion you may want to have a printout of the contents of a folder; perhaps My Documents, or a folder within My Documents. There is no option to print the contents of a folder anywhere in Microsoft Windows.
If you would like this capability, follow the steps below. You will be creating a small .bat file, saving it, and having Windows add the function to the right-click menu for folders.
  1. Click Start | All Programs | Accessories | Notepad.
  2. Carefully type or copy the following text. Make sure you press the Enter key after each line.
  3. @echo off dir %1 /~p /o:gn > "%temp%\Listing" start /w notepad /p "%temp%\Listing" del "%temp%\Listing" exit
  4. Click File | Save. To specify the location, click My Computer to the left. Double-click the C drive folder (or whichever drive your Windows operating system is installed on.)
  5. For the file name, enter %windir%\PrintList.bat - and then click Save.
  6. Click Start | Control Panel. (If using Classic mode, click Start | Settings | Control Panel).
  7. From the Control Panel, double click Folder Options (If in category view, click Appearances and Themes first).
  8. On the Folder Options window, click the File Types tab.
  9. Inside the Registered File Types window, click on the File Types heading so the list of file types will be sorted alphabetically.
  10. Scroll down and click on the file type File Folder. There are several entries that look very similar, so make sure you select File Folder. Then click the Advanced button at the bottom.
  11. On the Edit File Type window, click New. In the Action box, type Print Folder Listing
  12. Place the cursor in the Application box and click Browse. Click My Computer, double-click the C drive folder (or whichever drive you save the file you created above), and double-click on the file PrintList.bat.
  13. Click OK two times, and then click Close.

To print the list of files in a folder, right click on a folder and click Print Folder Listing. The output will be sent immediately to your PC's default printer.

Cool Ways to View Your PC Files

Did you know you can view your PC files in a variety of ways? A lot of folks are not aware of the Views icon, so let talk about it!


How do I see my files in Windows?

You view and manage your files and folders in Microsoft Windows by using My Computer or Windows Explorer. We recommend Windows Explorer and explain why in one of Keynote Support's "Windows for Beginners" tutorials: Using Windows Explorer to Manage and Organize Your Data.

Windows has reserved the My Documents (or Documents) folder for your use. It is easy to create new folders and move files. You should organize your PC's data and know where to find files. It is no different than organizing your filing cabinet at home.


What are the different ways I can view my files?

Your files - documents, images, spreadsheets, audio files, video files, etc. - can be viewed in a variety of ways. Click the small down arrow in the upper right corner as shown in the above image.

This brings up a tall menu, shown below, listing the various ways that the files in the active folder can be seen. We'll discuss each view below.

  • Extra Large Icons: Called Thumbnails in older versions of Microsoft Windows.For photos and images, a good size thumbnail of the image displays. This is helpful if you have a folder with many images and you are trying to locate a particular image. For non-image files, a logo displays depicting the program (e.g. Excel) or file type (e.g. MPG4).
  • Large Icons, Medium Icons, and Small Icons: The Large icons are large enough to be very useful. Medium icons are not very useful, and one can barely see the Small icons.
  • List: displays folders and file names only, along with a tiny icon. You can view more files in a given space than with the other display options, but only the name is provided. This may be sufficient for many PC users or users with small monitors.
  • Details: displays columns of information about the files. You can choose what data columns to display by right-clicking on a column heading. To sort by a particular column, click on the column name. Details is a useful display option.
  • Tiles: On current systems, Tiles shows a medium-size icon or thumbnail, the file name, the type of document, and the document size in KB, MB, etc.
  • Content: This option also shows each file, on its own row, preceeded by a medium-size icon or thumbnail. It lists the Author, Dates, and Size, if applicable.


How to Have CD or DVD Automatically Start to Play on Your PC


Do you primarily use your media drives to play CDs and DVDs? Do you ever get tired of having Windows ask you what you want to do when you pop in the disc?


You can tell Windows to automatically play that CD or DVD as soon as you put it in the drive! How? By activating Window’s AutoPlay feature. Follow these steps:
  1. On your Windows PC, get into Windows Explorer, also called My Computer or Computer.
  2. Find the CD or DVD drive on which you would like a CD or DVD to automatically play upon insertion into the drive.
  3. Right-click on the drive and click Properties.
  4. Click the AutoPlay tab at the top of the window.
  5. Under Actions, click “Select an action to perform.”
  6. Click on the action to perform. If you have multiple media players on your PC, you must choose one.
  7. Click Apply, and click OK.

If you have two drives, repeat the steps above for the other drive.

Now, whenever you put that CD or DVD into the drive, it should automatically begin to play.

Won't it be nice to not have that annoying small window popping up every time you insert a CD or DVD asking you what you want to do?

Cheers!


Create a Website Shortcut Internet Explorer Must Open


When you double-click a website shortcut that is sitting on your desktop, your default browser will open the website. But what if there is a website that you MUST open with Internet Explorer?

This is not an unusual request, unfortunately, since there are still some websites, and applications tied to websites, that must use Internet Explorer to work properly.

So - here’s how you do it!
  • Bring the website up in any browser, but size the browser window so that part of your desktop is visible. Highlight the website’s entire URL or address, right-click, and click Copy
  • Next, go to your desktop. Right-click on an empty place on the desktop, hover the cursor over New and click Shortcut. The Create Shortcut window will open
  • Click the Browse button. Even though My Computer may already be highlighted, gently single-click on My Computer. Then click once on Local Disk (C), click once on Program Files, and click once on Internet Explorer. Look for a file named iexplore.exe
  • Click once on iexplore.exe, and click OK
  • Now, in the Create Shortcut window, carefully place the cursor at the very end of the text in the location field ... right after the quotation mark. Press the spacebar once. Then right-click and click Paste.
  • Click Next. If you get an error message, cancel the process and begin again with Step #2 above
  • If you do not get an error message, type a name for your shortcut and click OK
  • Double-click your new shortcut and Internet Explorer will open the website you have chosen

The text in the location field of the Create Shortcut window should look similar to this, except that your website URL will be different of course:

"C:\Program Files\Internet Explorer\iexplore.exe" https://www.website-name.com/

Thanks for stopping by. Cheers!


Cleaning Up Disk Space

Even if you have a lot of disk space, it is a good idea to remove unneeded files on a regular basis as a good housekeeping practice and to help your anti-virus and anti-malware scans complete faster. If you’re tight on disk space, it is a must. Here are two tasks you should complete on a regular basis.

Run Windows Disk Cleanup
  • For Windows, click Start / All Programs / Accessories / Systems Tools / Disk Cleanup.
  • Change the disk if desired and click OK. On the Disk Cleanup tab of the Disk Cleanup window, Windows will list the files eligible for deletion.
  • Check the following boxes: Temporary Internet Files, Temporary Files, and Web Client / Publisher Temporary Files.
  • Do NOT compress old files or delete the contents of the Recycle Bin. If the Recycle bin is quite full, manually clean it up at a later time.
  • Click OK and click Yes.

Cleanup Browser Work Files

CHROME
  • Open Chrome and in the upper right corner click three vertical dots More.
  • Click More tools and click Clear browsing data.
  • Select a time frame or All time.
  • Choose the types of data you wish to delete and click Clear data


INTERNET EXPLORER
  • On the top menu line, click Tools / Internet Options.
  • On the General tab, in the Browsing history section, click Delete.
  • Then click Delete all at the bottom. Alternately, you can click individual items, but Delete all is recommended.
  • Click Yes, and when Internet Explorer is finished, click OK.

FIREFOX

On the top menu line, click Tools / Clear Private Data.

To customize what Private Data is cleared, follow these instructions:
  • Click Tools / Options.
  • Click the Privacy tab and, in the Private Data section, click Settings.
  • Put a check mark by the items you want cleared when you specify Clear Private Data. Unless you use Offline Website Data, it would not hurt to check every box.

On the Privacy tab, you can also choose settings regarding Cookies. A good compromise between privacy and security is to check Accept cookies from sites, de-select Accept third-party cookies, and after Keep Until, choose "I close Firefox." Then click OK.